TL;DR: - Demo implementation: Implement a website using websockets and communicate using voice with the RealtimeAgent - Introducing WebSocketAudioAdapter: Stream audio directly from your browser using WebSockets. - Simplified Development: Connect to real-time agents quickly and effortlessly with minimal setup.
Realtime over WebSockets#
In our previous blog post, we introduced a way to interact with the RealtimeAgent using TwilioAudioAdapter. While effective, this approach required a setup-intensive process involving Twilio integration, account configuration, number forwarding, and other complexities. Today, we're excited to introduce theWebSocketAudioAdapter, a streamlined approach to real-time audio streaming directly via a web browser.
This post explores the features, benefits, and implementation of the WebSocketAudioAdapter, showing how it transforms the way we connect with real-time agents.
Why We Built the WebSocketAudioAdapter#
Challenges with Existing Solutions#
Previously introduced TwilioAudioAdapter provides a robust way to connect to your RealtimeAgent, but it comes with challenges: - Browser Limitations: For teams building web-first applications, integrating with a telephony platform can feel redundant. - Complex Setup: Configuring Twilio accounts, verifying numbers, and setting up forwarding can be time-consuming. - Platform Dependency: This solution requires developers to rely on external API, which adds latency and costs.
Our Solution#
The WebSocketAudioAdapter eliminates these challenges by allowing direct audio streaming over WebSockets. It integrates seamlessly with modern web technologies, enabling real-time voice interactions without external telephony platforms.
How It Works#
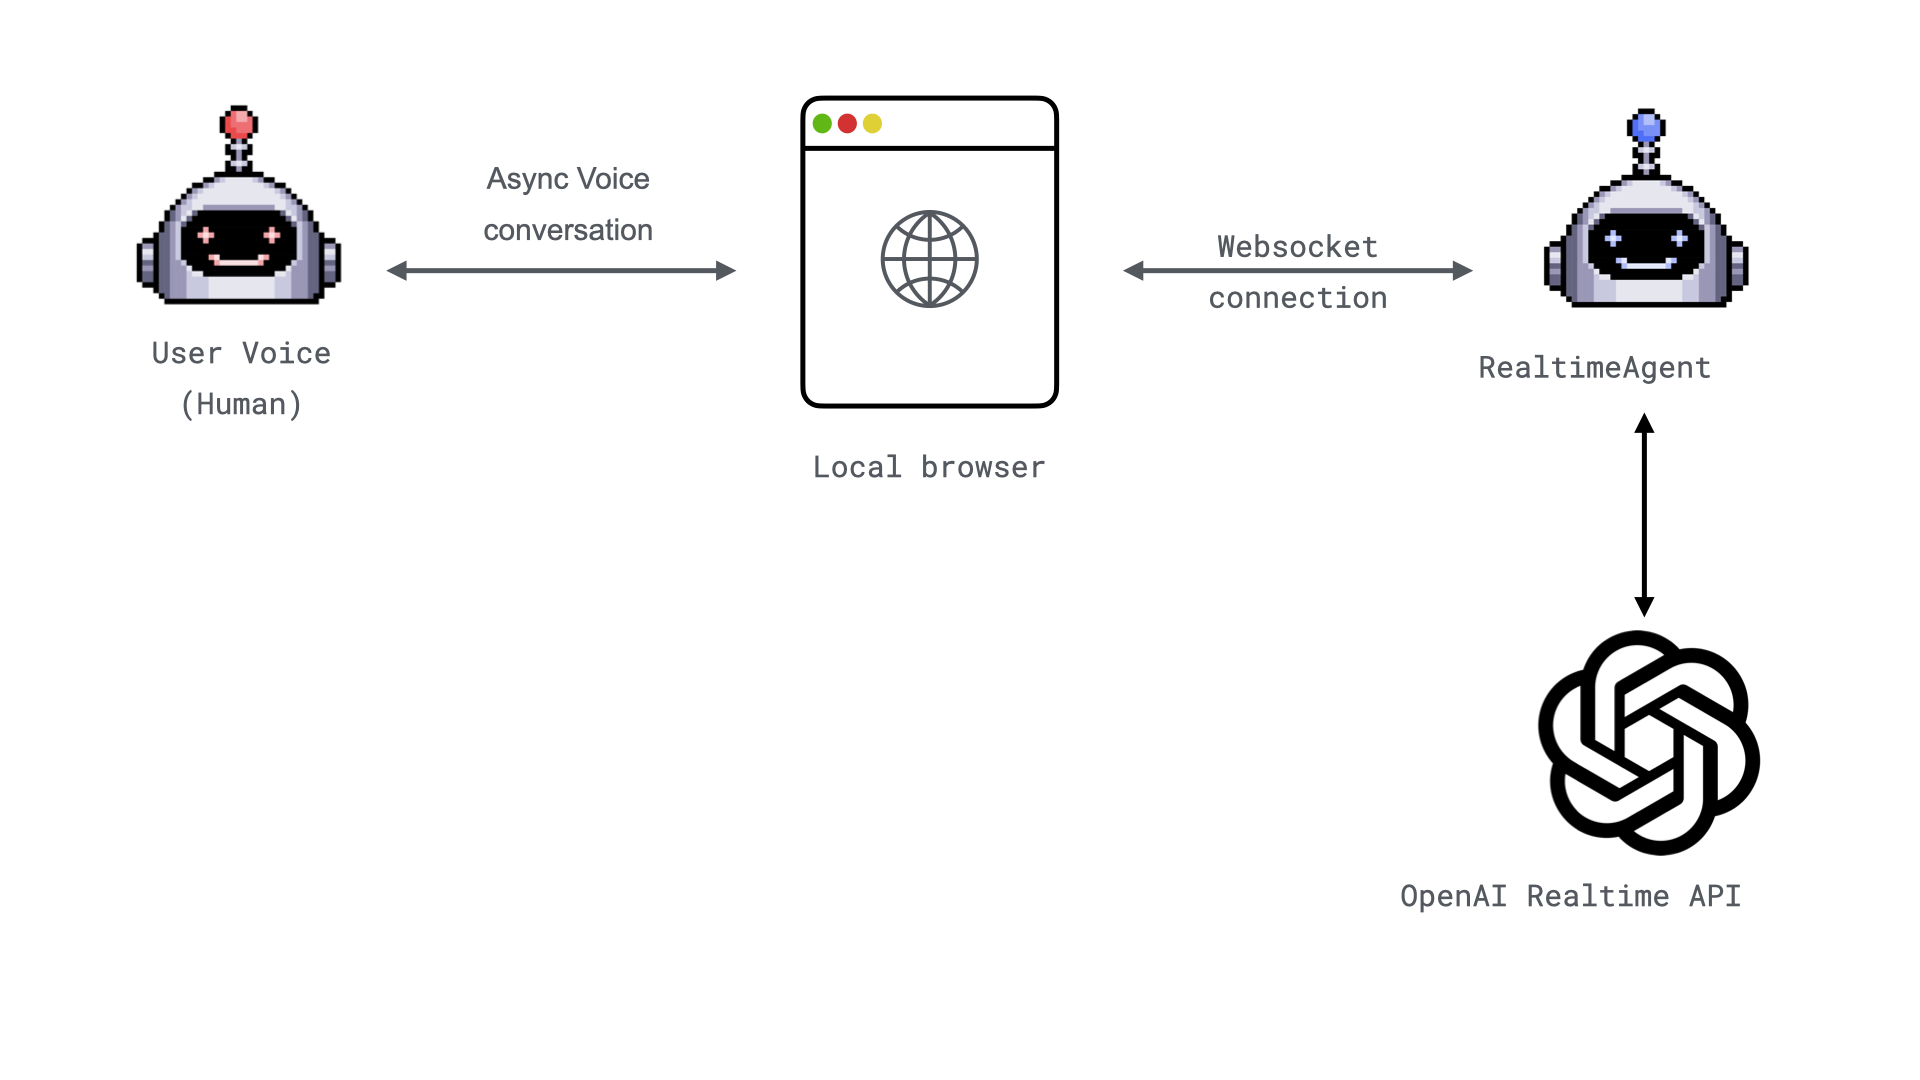
At its core, the WebSocketAudioAdapter leverages WebSockets to handle real-time audio streaming. This means your browser becomes the communication bridge, sending audio packets to a server where a RealtimeAgent agent processes them.
Here’s a quick overview of its components and how they fit together:
-
WebSocket Connection:
-
The adapter establishes a WebSockets connection between the client (browser) and the server.
-
Audio packets are streamed in real time through this connection.
-
Integration with FastAPI:
-
Using Python's FastAPI framework, developers can easily set up endpoints for handling WebSockets traffic.
-
Powered by Realtime Agents:
-
The audio adapter integrates with an AI-powered
RealtimeAgent, allowing the agent to process audio inputs and respond intelligently.
Key Features#
1. Simplified Setup#
Unlike TwilioAudioAdapter, the WebSocketAudioAdapter requires no phone numbers, no telephony configuration, and no external accounts. It's a plug-and-play solution.
2. Real-Time Performance#
By streaming audio over WebSockets, the adapter ensures low latency, making conversations feel natural and seamless.
3. Browser-Based#
Everything happens within the user's browser, meaning no additional software is required. This makes it ideal for web applications.
4. Flexible Integration#
Whether you're building a chatbot, a voice assistant, or an interactive application, the adapter can integrate easily with existing frameworks and AI systems.
Example: Build a Voice-Enabled Weather Bot#
Let’s walk through a practical example where we use the WebSocketAudioAdapter to create a voice-enabled weather bot. You can find the full example here.
To run the demo example, follow these steps:
1. Clone the Repository#
git clone https://github.com/ag2ai/realtime-agent-over-websockets.git
cd realtime-agent-over-websockets
2. Set Up Environment Variables#
Create a OAI_CONFIG_LIST file based on the provided OAI_CONFIG_LIST_sample:
api_key to your OpenAI and/or Gemini API keys. (Optional) Create and use a virtual environment#
To reduce cluttering your global Python environment on your machine, you can create a virtual environment. On your command line, enter:
3. Install Dependencies#
Install the required Python packages using pip:
4. Start the Server#
Run the application with Uvicorn:
After you start the server you should see your application running in the logs:
INFO:     Started server process [64425]
INFO:     Waiting for application startup.
INFO:     Application startup complete.
INFO:     Uvicorn running on http://0.0.0.0:5050 (Press CTRL+C to quit)
Ready to Chat? 🚀#
Now you can simply open localhost:5050/start-chat in your browser, and dive into an interactive conversation with the RealtimeAgent! 🎤✨

To get started, simply speak into your microphone and ask a question. For example, you can say:
"What's the weather like in Seattle?"
This initial question will activate the agent, and it will respond, showcasing its ability to understand and interact with you in real time.
Code review#
Let’s dive in and break down how this example works—from setting up the server to handling real-time audio streaming with WebSockets.
Set Up the FastAPI app#
We use FastAPI to serve the chat interface and handle WebSocket connections. A key part is configuring the server to load and render HTML templates dynamically for the user interface.
- Template Loading: Use
Jinja2Templatesto loadchat.htmlfrom thetemplatesdirectory. The template is dynamically rendered with variables like the server'sport. - Static Files: Serve assets (e.g., JavaScript, CSS) from the
staticdirectory.
app = FastAPI()

@app.get("/", response_class=JSONResponse)
async def index_page() -> dict[str, str]:
    return {"message": "WebSocket Audio Stream Server is running!"}

website_files_path = Path(__file__).parent / "website_files"

app.mount(
    "/static", StaticFiles(directory=website_files_path / "static"), name="static"
)

templates = Jinja2Templates(directory=website_files_path / "templates")

@app.get("/start-chat/", response_class=HTMLResponse)
async def start_chat(request: Request) -> HTMLResponse:
    """Endpoint to return the HTML page for audio chat."""
    port = request.url.port
    return templates.TemplateResponse("chat.html", {"request": request, "port": port})
Defining the WebSocket Endpoint#
The /media-stream WebSocket route is where real-time audio interaction is processed and streamed to the AI assistant. Let’s break it down step-by-step:
- Accept the WebSocket Connection The WebSocket connection is established when a client connects to
/media-stream. Usingawait websocket.accept(), we ensure the connection is live and ready for communication.
@app.websocket("/media-stream")
async def handle_media_stream(websocket: WebSocket) -> None:
    """Handle WebSocket connections providing audio stream and OpenAI."""
    await websocket.accept()
- Initialize Logging A logger instance (
getLogger("uvicorn.error")) is set up to monitor and debug the server's activities, helping track events during the connection and interaction process.
WebSocketAudioAdapter The WebSocketAudioAdapter bridges the client’s audio stream with the RealtimeAgent. It streams audio data over WebSockets in real time, ensuring seamless communication between the browser and the agent. -
Configure the Realtime Agent The
RealtimeAgentis the AI assistant driving the interaction. Key parameters include: -
Name: The agent identity, here called
"Weather Bot". - System Message: System message for the agent.
- Language Model Configuration: Defined by
realtime_llm_configfor LLM settings. - Audio Adapter: Connects the
WebSocketAudioAdapterfor handling audio. - Logger: Logs the agent's activities for better observability.
    realtime_agent = RealtimeAgent(
        name="Weather Bot",
        system_message="Hello there! I am an AI voice assistant powered by Autogen and the OpenAI Realtime API. You can ask me about weather, jokes, or anything you can imagine. Start by saying 'How can I help you'?",
        llm_config=realtime_llm_config,
        audio_adapter=audio_adapter,
        logger=logger,
    )
-
Define a Custom Realtime Function The
get_weatherfunction is registered as a realtime callable function. When the user asks about the weather, the agent can call the function to get an accurate weather report and respond based on the provided information: -
Returns
"The weather is cloudy."for"Seattle". - Returns
"The weather is sunny."for other locations.
    @realtime_agent.register_realtime_function(  # type: ignore [misc]
        name="get_weather", description="Get the current weather"
    )
    def get_weather(location: Annotated[str, "city"]) -> str:
        return (
            "The weather is cloudy."
            if location == "Seattle"
            else "The weather is sunny."
        )
- Run the Realtime Agent The
await realtime_agent.run()method starts the agent, handling incoming audio streams, processing user queries, and responding in real time.
Here is the full code for the /media-stream endpoint:
@app.websocket("/media-stream")
async def handle_media_stream(websocket: WebSocket) -> None:
    """Handle WebSocket connections providing audio stream and OpenAI."""
    await websocket.accept()

    logger = getLogger("uvicorn.error")

    audio_adapter = WebSocketAudioAdapter(websocket, logger=logger)

    realtime_agent = RealtimeAgent(
        name="Weather Bot",
        system_message="Hello there! I am an AI voice assistant powered by Autogen and the OpenAI Realtime API. You can ask me about weather, jokes, or anything you can imagine. Start by saying 'How can I help you'?",
        llm_config=realtime_llm_config,
        audio_adapter=audio_adapter,
        logger=logger,
    )

    @realtime_agent.register_realtime_function(  # type: ignore [misc]
        name="get_weather", description="Get the current weather"
    )
    def get_weather(location: Annotated[str, "city"]) -> str:
        return (
            "The weather is cloudy."
            if location == "Seattle"
            else "The weather is sunny."
        )

    await realtime_agent.run()
Benefits in Action#
- Quick Prototyping: Spin up a real-time voice application in minutes.
- Cost Efficiency: Eliminate third-party telephony costs.
- User-Friendly: Runs in the browser, making it accessible to anyone with a microphone.
Conclusion#
The WebSocketAudioAdapter marks a shift toward simpler, more accessible real-time audio solutions. It empowers developers to build and deploy voice applications faster and more efficiently. Whether you're creating an AI assistant, a voice-enabled app, or an experimental project, this adapter is your go-to tool for real-time audio streaming.
Try it out and bring your voice-enabled ideas to life!