Using Neo4j's graph database with AG2 agents for Question & Answering#
![]()
AG2 provides GraphRAG integration through agent capabilities. This is an example utilising the integration of Neo4j’s property graph database with LlamaIndex’s graph query engine.
Requirements
To install the LlamaIndex, Neo4j, and document processing dependencies, install with the 'neo4j' extra:
Note: If you have been using
orautogenorag2, all you need to do is upgrade it using:
asautogen, andag2are aliases for the same PyPI package.
Set Configuration and OpenAI API Key#
By default, in order to use LlamaIndex with Neo4j you need to have an OpenAI key in your environment variable OPENAI_API_KEY.
You can utilise an OAI_CONFIG_LIST file and extract the OpenAI API key and put it in the environment, as will be shown in the following cell.
Alternatively, you can load the environment variable yourself.
Tip
Learn more about configuring LLMs for agents here.
import os

from dotenv import load_dotenv

import autogen

load_dotenv()

llm_config = autogen.LLMConfig(
    config_list=[
        {
            "model": "gpt-5-mini",
            "api_key": os.getenv("OPENAI_API_KEY"),
            "api_type": "openai",
        }
    ]
)
# Put the OpenAI API key into the environment
os.environ["OPENAI_API_KEY"] = llm_config.config_list[0]["api_key"]
# This is needed to allow nested asyncio calls for Neo4j in Jupyter
import nest_asyncio

nest_asyncio.apply()
Key Information: Using Neo4j with LLM Models 🚀#
Important
- Default Models: - Question Answering: OpenAI’sgpt-4.1withtemperature=0.0. - Embedding: OpenAI’stext-embedding-3-small.
- Customization: You can change these defaults by setting the following parameters on the
Neo4jGraphQueryEngine:
llm: Specify a LLM instance with a llm you like.embedding: Specify a BaseEmbedding instance with a embedding model.- Reference
- https://docs.llamaindex.ai/en/stable/module_guides/models/llms/
- https://docs.llamaindex.ai/en/stable/examples/property_graph/graph_store/
Create a Knowledge Graph with Your Own Data#
Note: You need to have a Neo4j database running. If you are running one in a Docker container, please ensure your Docker network is setup to allow access to it.
In this example, the Neo4j endpoint is set to host=“bolt://172.17.0.3” and port=7687, please adjust accordingly. For how to spin up a Neo4j with Docker, you can refer to this
We initialise the database with a Word document, creating the Property graph in Neo4j.
# IMPORTS
from llama_index.embeddings.openai import OpenAIEmbedding
from llama_index.llms.openai import OpenAI

from autogen import ConversableAgent, UserProxyAgent
from autogen.agentchat.contrib.graph_rag.neo4j_graph_query_engine import Neo4jGraphQueryEngine
A Simple Example#
In this example, the graph schema is auto-generated. Entities and relationship are created as they fit into the data
LlamaIndex supports a lot of extensions including docx, text, pdf, csv, etc. Find more details in Neo4jGraphQueryEngine. You may need to install dependencies for each extension. In this example, we need pip install docx2txt
We start by creating a Neo4j property graph (knowledge graph) with a sample employee handbook of a fictional company called BUZZ
# load documents
from autogen.agentchat.contrib.graph_rag.document import Document, DocumentType

input_path = "../test/agentchat/contrib/graph_rag/BUZZ_Employee_Handbook.docx"
input_documents = [Document(doctype=DocumentType.TEXT, path_or_url=input_path)]
# pip install docx2txt
# Auto generate graph schema from unstructured data

# Create Neo4jGraphQueryEngine
query_engine = Neo4jGraphQueryEngine(
    username="neo4j",  # Change if you reset username
    password="password",  # Change if you reset password
    host="bolt://172.17.0.3",  # Change
    port=7687,  # if needed
    llm=OpenAI(model="gpt-4.1", temperature=0.0),  # Default, no need to specify
    embedding=OpenAIEmbedding(model_name="text-embedding-3-small"),  # except you want to use a different model
    database="neo4j",  # Change if you want to store the graphh in your custom database
)

# Ingest data and create a new property graph
query_engine.init_db(input_doc=input_documents)
Instead of creating a new property graph, if you want to use an existing graph, you can connect to its database
from llama_index.embeddings.openai import OpenAIEmbedding
from llama_index.llms.openai import OpenAI

from autogen.agentchat.contrib.graph_rag.neo4j_graph_query_engine import Neo4jGraphQueryEngine

query_engine = Neo4jGraphQueryEngine(
    username="neo4j",  # Change if you reset username
    password="password",  # Change if you reset password
    host="bolt://172.17.0.3",  # Change
    port=7687,  # if needed
    llm=OpenAI(model="gpt-4.1", temperature=0.0),  # Default, no need to specify
    embedding=OpenAIEmbedding(model_name="text-embedding-3-small"),  # except you want to use a different model
    database="neo4j",  # Change if you want to store the graphh in your custom database
)

# Connect to the existing graph
query_engine.connect_db()
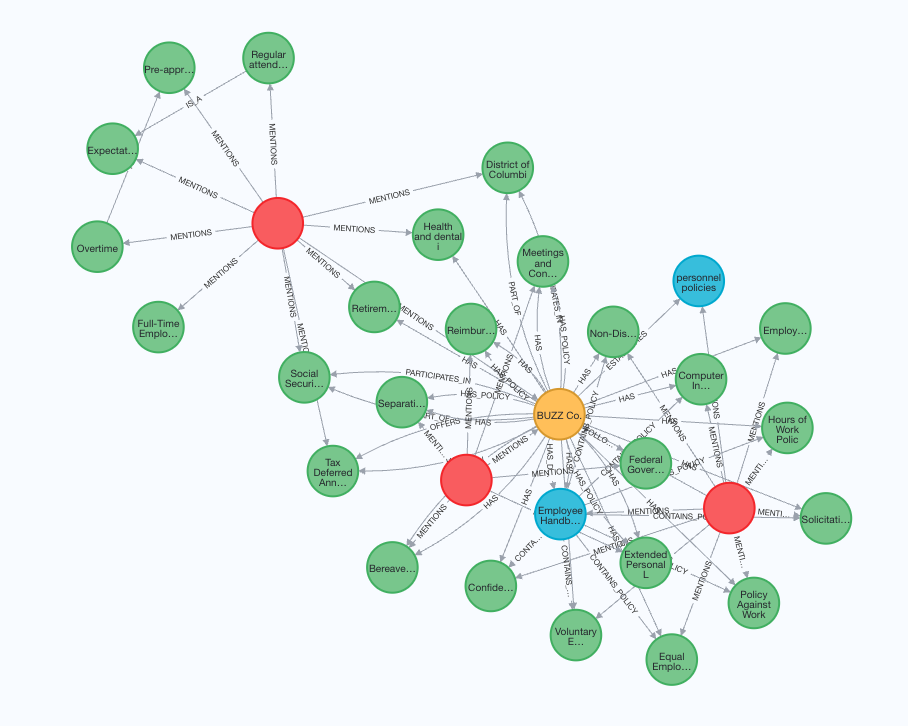
An example property graph:
Add capability to a ConversableAgent and query them#
Notice that we intentionally moved the specific content of Equal Employment Opportunity Policy into a different document to add later
from autogen.agentchat.contrib.graph_rag.neo4j_graph_rag_capability import Neo4jGraphCapability

# Create a ConversableAgent (no LLM configuration)
graph_rag_agent = ConversableAgent(
    name="buzz_agent",
    human_input_mode="NEVER",
)

# Associate the capability with the agent
graph_rag_capability = Neo4jGraphCapability(query_engine)
graph_rag_capability.add_to_agent(graph_rag_agent)

# Create a user proxy agent to converse with our RAG agent
user_proxy = UserProxyAgent(
    name="user_proxy",
    human_input_mode="ALWAYS",
)

user_proxy.initiate_chat(graph_rag_agent, message="Which company is the employer?")
Revisit the example by defining custom entities, relations and schema#
By providing custom entities, relations and schema, you could guide the engine to create a graph that better extracts the structure within the data.
We set strict=True to tell the engine to only extracting allowed relationships from the data for each entity
from typing import Literal

# best practice to use upper-case
entities = Literal["EMPLOYEE", "EMPLOYER", "POLICY", "BENEFIT", "POSITION", "DEPARTMENT", "CONTRACT", "RESPONSIBILITY"]
relations = Literal[
    "FOLLOWS",
    "PROVIDES",
    "APPLIES_TO",
    "DEFINED_AS",
    "ASSIGNED_TO",
    "PART_OF",
    "MANAGES",
    "REQUIRES",
    "ENTITLED_TO",
    "REPORTS_TO",
]

# Define which entities can have which relationships. It can also be used a a guidance if strict is False.
schema = {
    "EMPLOYEE": ["FOLLOWS", "APPLIES_TO", "ASSIGNED_TO", "ENTITLED_TO", "REPORTS_TO"],
    "EMPLOYER": ["PROVIDES", "DEFINED_AS", "MANAGES", "REQUIRES"],
    "POLICY": ["APPLIES_TO", "DEFINED_AS", "REQUIRES"],
    "BENEFIT": ["PROVIDES", "ENTITLED_TO"],
    "POSITION": ["DEFINED_AS", "PART_OF", "ASSIGNED_TO"],
    "DEPARTMENT": ["PART_OF", "MANAGES", "REQUIRES"],
    "CONTRACT": ["PROVIDES", "REQUIRES", "APPLIES_TO"],
    "RESPONSIBILITY": ["ASSIGNED_TO", "REQUIRES", "DEFINED_AS"],
}
Create the query engine and load the document#
# Create Neo4jGraphQueryEngine
query_engine = Neo4jGraphQueryEngine(
    username="neo4j",  # Change these as needed
    password="neo4jneo4j",
    host="bolt://192.168.0.115",
    port=7687,
    database="neo4j",
    llm=OpenAI(model="gpt-4.1", temperature=0.0),
    embedding=OpenAIEmbedding(model_name="text-embedding-3-small"),
    entities=entities,  # possible entities
    relations=relations,  # possible relations
    schema=schema,
    strict=True,  # enforce the extracted relationships to be in the schema
)

# Ingest data and initialize the database
query_engine.init_db(input_doc=input_documents)
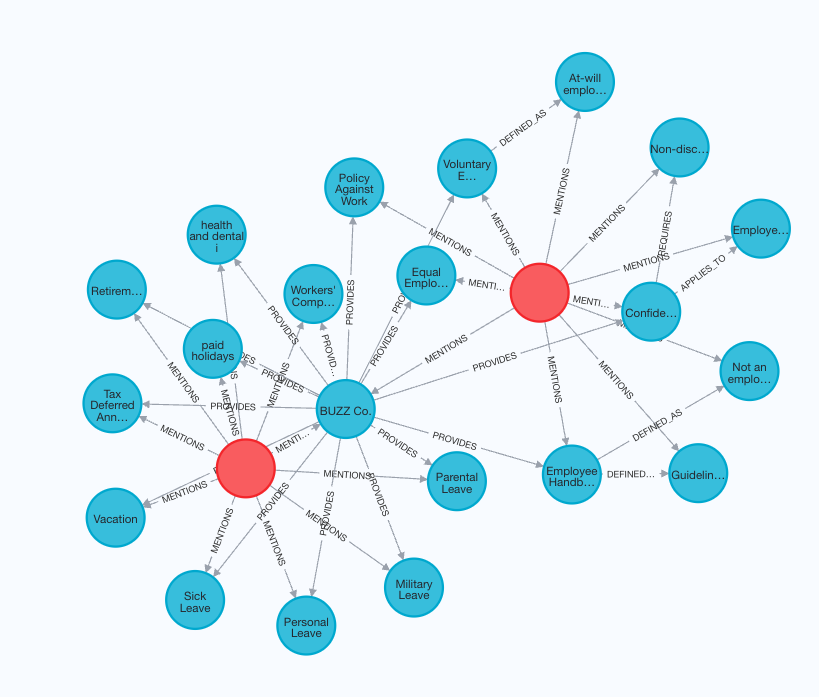
The Property graph screenshot is shown below:
Add capability to a ConversableAgent and query them again#
You should find the answers are much more detailed and accurate since our schema fits well
from autogen import ConversableAgent, UserProxyAgent
from autogen.agentchat.contrib.graph_rag.neo4j_graph_rag_capability import Neo4jGraphCapability

# Create a ConversableAgent (no LLM configuration)
graph_rag_agent = ConversableAgent(
    name="rag_agent",
    human_input_mode="NEVER",
)

# Associate the capability with the agent
graph_rag_capability = Neo4jGraphCapability(query_engine)
graph_rag_capability.add_to_agent(graph_rag_agent)

# Create a user proxy agent to converse with our RAG agent
user_proxy = UserProxyAgent(name="user_proxy", human_input_mode="ALWAYS", code_execution_config=False)

user_proxy.initiate_chat(graph_rag_agent, message="Which company is the employer?")
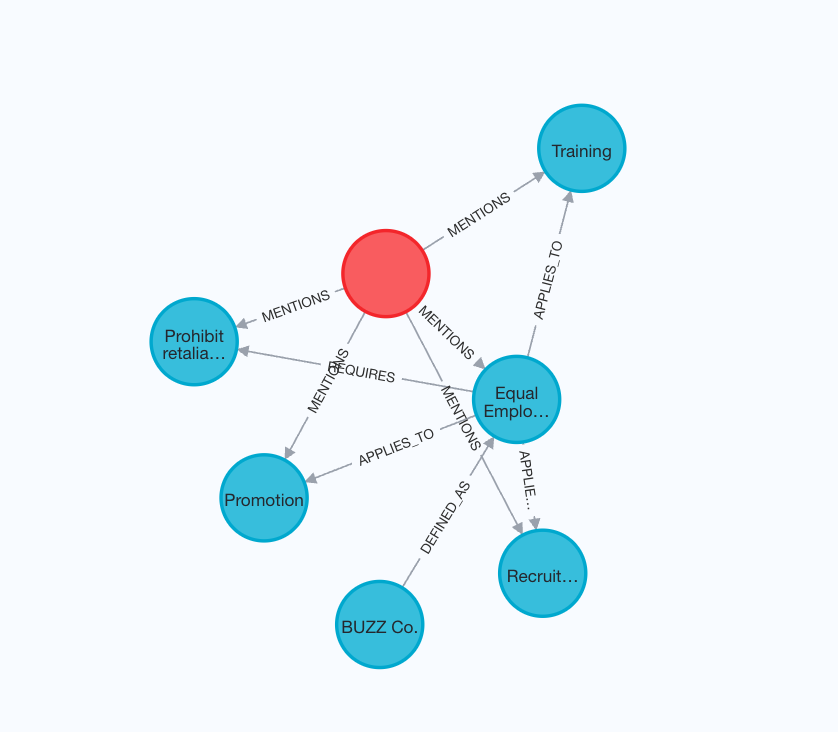
Incrementally add new documents to the existing knoweledge graph.#
input_path = "../test/agentchat/contrib/graph_rag/BUZZ_Equal-Employment-Opportunity-Policy-Detailed.docx"
input_documents = [Document(doctype=DocumentType.TEXT, path_or_url=input_path)]

_ = query_engine.add_records(input_documents)
Checking the property graph, we’ll find a different Equal Employment Opportunity Policy Node